 In this activity we'll be making crystals, as a 2-day project. We used a kit, but that's not strictly necessary, as we'll explain below. Our crystals were grown using alum powder. Alum crystals will be colorless and non-toxic. Alum can be found in the spice aisle at the grocery store. It's used for pickling vegetables.
Our kit was designed for kids. If you don't want to use a kit, there are different kinds of alum. The edible one is potassium alum. But check the labels for safety information; some types of alum are non-toxic, but others are irritants and not edible. 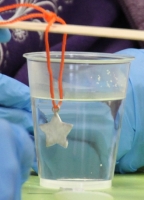 Here's what we did to grow alum crystals using the kit. The powder is added to a cup half full of hot water, and stirred with a spoon. Choose a clear cup (heat resistant) so you can watch the crystals grow. A thread was tied to an ornament, and suspended in the water with a stick.
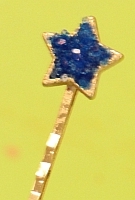
 After the crystals were grown, we coloured them with the supplied paints; you could also use food colouring. Rubber gloves will keep alum off your fingers; while harmless, it doesn't taste very good! The kit came with various ornaments to grow the crystals on, such as barrettes, hearts, and rings, along with chains. If you're not using a kit, you can use any small item like a brooch or pendant. It should be empty and have a small edge on the side so you can grow your crystals inside. Mix a paste of alum powder and clear nailpolish, and coat the inner surface of the pendant. This is where the growing crystals will attach. This must dry thoroughly for a day before proceeding. You will want to do this part in advance. When you're ready to proceed, you'll need two or three tablespoons of alum powder, depending on the size of your glass. The water must also be very hot. The idea is to make a supersaturated solution of alum in the water. You do this by continually adding alum and stirring, over and over. As the powder disappears into solution, add more and keep stirring. Eventually the powder you add won't dissolve no matter how hard you stir; your solution is now supersaturated. 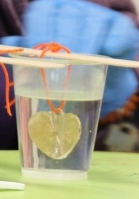 We suspended the ornament from a thread using a stick at the top of the cup to hold it in place below the surface of the water and not touching the sides or bottom of the cup. You can also just rest the ornament on the bottom of the cup if you want.
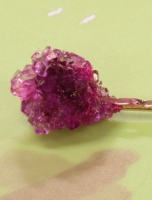
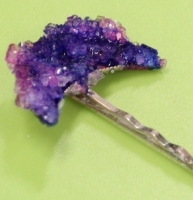
Put the cup away somewhere where it won't be jostled. Our kit came with small ornaments, so the crystals grew after 24 hours. With bigger items the process could take several days. If your crystals don't grow at all, it was because you didn't dissolve enough alum in the water.  Once your crystals are grown, remove the ornament from the water and take off the thread. Crystals may have grown on the sides and back of the ornament where you don't want them; these can easily be removed with tweezers or a tiny knife.
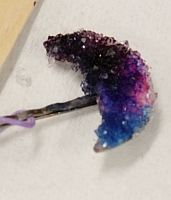
Now it's time to paint them. Use paint very sparingly; if you want it to be multicoloured, let the first colour spead and dry before adding a second colour. You may wonder if it's possible to colour the crystals by adding paint to the water before they start growing. This will work, but for the small crystals we grew, the colour would have been very faint. 

Growing Sugar Crystals You can make candy in crystal form from a supersaturated solution of sugar in a very similar way. First heat one cup of water in a pot along with three cups of sugar. Add some food colouring; the more you add, the deeper the colour will be. You can also add flavouring, like vanilla extract. As the solution heats up, continue to stir it; more and more sugar will dissolve. The solution will look cloudy. You want to heat it until the solution turns clear and starts to bubble. Be very careful - the solution is very hot. Let it cool for 5-10 minutes before proceeding. Moisten a popsicle stick and roll it in some sugar; let it dry. Then lower it into a clear jar and suspend it somehow so that it doesn't touch the sides. Pour the hot sugar solution into this jar. Growing a larger collection of crystals this way takes time because the crystals grow as the water evaporates. Cover the top of the jar with a paper towel to prevent dust from getting into the jar. Put the jar some place where it won’t be disturbed. Check on your crystals every day. If a crust of crystals forms across the top of the jar, remove it with a fork or spoon so water can continue to evaporate. When your candy on a stick is big enough, which may take up to a week or more, you can take it out and eat it. If you want to save it, let it dry and store it in a closed container. 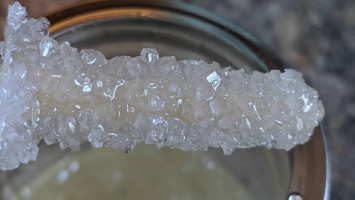 This seems like a pretty unhealthy snack, but everything is relative. The amount of sugar involved in the crystal formation is probably less that what you'd get in a pop and chocolate bar. We did that experiment; check it out here.
|