 When you focus on the subject of your photo, you can control exactly what part of your photo is actually in focus, and blur the rest. This will be based on how close your intended subject is to the camera.
This can make the selected part of your image really stand out.
Specifically, you can:
- Make a subject in the foreground be in focus, and everything behind it blurry
- Make something further away in focus, and everything closer and farther away blurry
- Make everything in the photo in focus
You control what is in focus by shooting in manual mode, zooming in (a telephoto lens really helps), and by setting the aperture to either really large (for a narrow depth of field) to really small (for a wide depth of field).
A narrow depth of field means your subject will be in focus, but everything closer and farther away will be blurry. The aperture should be as large as possible. On your camera, these are the f-stops, and the smallest number gives the largest aperture. So for example f/2.8 is a larger aperture than f/5, and will give a narrower depth of field. Just remember: the lowest f-stop number gives the smallest range of what's in focus.
A wide depth of field means everything in the photo, from close to far away, will all be in focus. The aperture should be as small as possible, at whatever slowest shutter speed you can get away with depending on how much movement there is of the subject. This means you need a large f-stop number, like f/16. Just remember: the highest f-stop number gives the biggest range of what's in focus.
Remember that you can also adjust the brightnes of your photo by adjusting the ISO setting. A good DSLR or mirrorless camera should give good quality images at ISO 1600.
Here are some examples:
Narrow Depth of Field 1:
In this example, the subject is in the foreground. Using a large aperture (small f-stop) will make everything behind her blurred.
This makes a very effective photo.
|
|

|
Narrow Depth of Field 2:
In the first photo, a narrow depth of field using a large aperture means that the subject at a medium distance (in the red shirt) is in focus; people closer and farther away are blurred.
This method works well with nature photography, where the subject should stand out using the same method, as in the second photo.
|
|

|

Here's another example. Notice how the two kids at the center seem to pop out of the photo. Using a telephoto lens makes the effect more noticeable.
There are also software programs that will selectively focus regions of your photograph to achieve the same effect. Photoshop does it.
For an iPhone, check out ReLens Camera-DSLR Portrait in the Apple store.
|
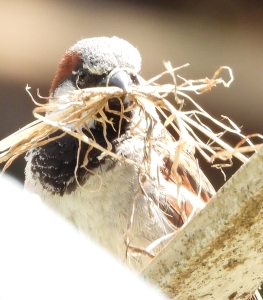
Narrow Depth of Field 3:
When shooting close-ups of animals or babies, the rule is to focus on the eyes, with a narrow depth of field (large aperture: small f-stop). This will make the back of the face and the hair/fur slightly out of focus, with a pleasing result.
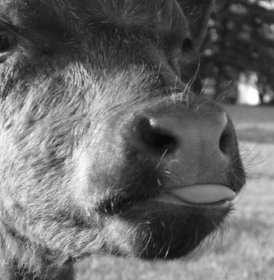
Sometimes you have to break that rule. LIke when you're taking photos of cows on 4H Day. Here I wanted the immediate business end of the cow, the tongue that was trying to lick me, to be in focus. I focused on the tongue and used a large aperture. Then I backed up quick!

Wide Depth of Field
A small aperture (large f-stop) will result in everyone, no matter how far away, to be in focus.
Depth of Field | Using Your Camera | Cameras | Good Photos | ISO | Editing Photos | Photography
|