 Page Two There are three types of levers, identified as first class, second class, and third class. The difference is where the fulcrum and applied force are, in relation to the load. Each class works differently, and is used to do different jobs. Let's look at the three types of levers in more detail.  The first class lever is the one you may be most familiar with. It uses a fulcrum in between, and the applied force and load are at opposite ends.
The diagram at the left shows a first class lever set up to move a heavy load with a small applied force. As explained on page 1, the force must be applied over a long distance, in order to make the heavy load move just a small amount. By adusting how far the fulcrum is from the load, you can control the mechanical advantage. The closer it is to the load, the more force is applied. 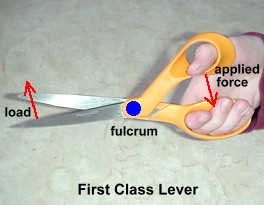 At the right is a common use for a first class lever ... or in this case, a pair of them. Notice that the two levers have a fulcrum between the applied force and the load ... that's what makes them first class levers.
The applied force is where your fingers are, pushing inwards on the handles. The load is at the blades where they meet, where a force must be overcome to cut through some material. It may look like the position of the fulcrum is not closer to the load, but it depends on where the blades meet. Cutting something close to the fulcrum puts the load closer, so you get mechanical advantage and multiplied force; you can easily cut through thick material. If the blades are doing the cutting at their tips, you don't get this advantage.  The second class lever is one where the fulcrum is at one end, and the applied force at the other. The load that is to be moved is between them.
This lever is different in how it works ... it causes the load to move in the same direction as the force you apply. Just as with a first class lever, how close the load is to the fulcrum determines by how much your force will be multiplied. If you want to move a very large load with a small applied force, you must put the load very close to the fulcrum. 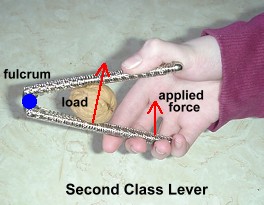 The wheelbarrow we showed on the first page was a good example of a second class lever. Here's another one, a nut cracker, and again we are using a pair of second class levers.
We know these are second class levers because the fulcrum is at one end, and the applied force is at the other. The load is in between. You get more mechanical advantage if you place the nut closer to the fulcrum than to your hand. The closer it is, the more your force gets multiplied. That's why it can still be difficult to crack a very large walnut ... you can't get it as close to the fulcrum as you can a small nut, so you have to apply more force ... the force isn't getting multiplied as much.  The third class lever is the strangest ... and the one you use the most!
The fulcrum is once again at one end of the lever, but this time the load is at the other end, and you apply a force in between. This lever can not give any mechanical advantage. Regardless of where you apply the force, the force you apply must always be greater than the force of a load. If you were using this lever to lift an object at a distance, it would require less force to just stand above it and lift it up ... using the lever will require more force! So why use a third class lever at all? The answer lies in the fact that the load moves in the same direction as the force you apply, which is convenient. So is the application of force between the load and the fulcrum. 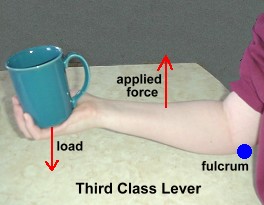 Have a look at the third class lever example at the right to see what we mean.
Yes, your arm is a third class lever. The fulcrum is at the elbow, and obviously the load is what you have in your hand. But where is the force applied?
Have a look at the third class lever example at the right to see what we mean.
Yes, your arm is a third class lever. The fulcrum is at the elbow, and obviously the load is what you have in your hand. But where is the force applied? The force is applied somewhere in between by a muscle attached above the fulcrum, on the upper arm. But this force can only pull at a very small angle to your arm bone, because the muscle itself is just above the bone . The force is applied somewhere in between by a muscle attached above the fulcrum, on the upper arm. But this force can only pull at a very small angle to your arm bone, because the muscle itself is just above the bone .
It pulls, under the skin, with a force applied to your lower arm where the muscle is attached to the bone (the pink arrow), but only a portion of that force (the red arrow) can be used to move the load. 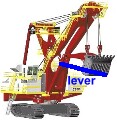 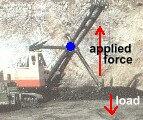 Here is another good example of a third class lever.
 The arm on a power shovel is a third class lever, with the fulcrum on the main boom, at the left end of the lever arm. The force is applied by the cables, somewhere along the arm. The load is at the far right end of the arm ... the scoop. As with all third class levers, the applied force must be larger than the load. But a motor takes care of that. This type of lever lets you lift things at a distance by pulling up. Now that you know all about levers, you might want to try a quiz to see if you can recognize which type of lever is which. If you want to try the quiz, go on to page three. |