 We also have a few designs you can try, with photographs and instructions. Making Your Airplanes Go Farther 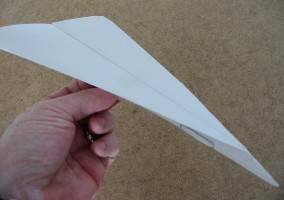 The most important thing you need to know about making your airplane travel a long distance is that you must be able to launch it at a fast speed.
This means the wings must be stiff ... if they're too floppy, they will collapse when you launch it. The most important thing you need to know about making your airplane travel a long distance is that you must be able to launch it at a fast speed.
This means the wings must be stiff ... if they're too floppy, they will collapse when you launch it.The best design for distance is a dart, as shown at the right. You should fold the wings towards the centre several times in order to make them very stiff, and use some tape at the top to hold them together. If the wings are stiff and a paperclip is added for balance, the distance your plane will travel is limited only by how fast you can throw it! Try experimenting with smaller darts made from stiff cardboard. you can launch them with an elastic band and make them travel 100 metres or more! Another interesting design that will travel long distances is the one shown below. In order to minimize drag, (the force of air friction) almost all of the non-wing parts are missing. This airplane is almost all wing! This design won't go as far as a dart (it can't be launched at the same high speed), but the distance it does travel will amaze you. 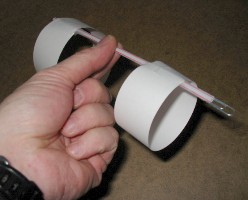  Just fasten two loops to a straw ... the one in front should be slightly smaller. Make sure the loops point in the same direction. A paperclip adds balance. Making Your Airplanes Stay Up Longer and Do Tricks 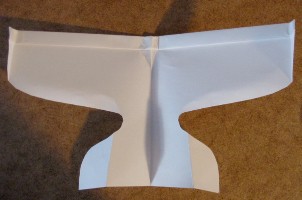 If the length of time your plane stays in the air is important, or you want to make it do aerobatics, here's a design that works. The aim is to make the wing surfaces provide as much lift as possible.
The airplane is made from a single sheet of paper. The wings don't have to be stiff, because you will launch it very slowly. Curved edges on the wing give it a lot of lift, and by changing their curvature, and the symmetry of the plane overall, you can make it turn and do loops. This design is called the 'Barnaby Flyer'. It was invented by Capt. Ralph S. Barnaby, USN (Ret), and it first appeared in his book "How to Make & Fly Paper Airplanes" (Scholastic Book Services 1968). The size and shape of the various parts of this plane are not critical. You don't have to measure anything, or cut especially carefully. We've even made one fly that we ripped out by hand, rather that cutting it out carefully with scissors. 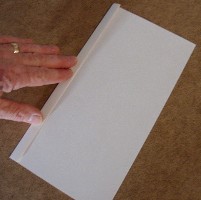
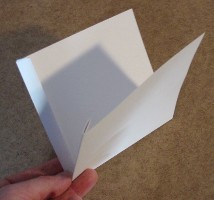
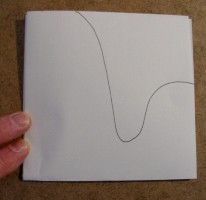 Begin by folding over the long edge of a sheet of paper continuously, until you almost reach the middle. Then crease and fold the sheet inwards (so the folded edge you just made is on the inside). Lay the folded paper flat, and trace the above design on one side. 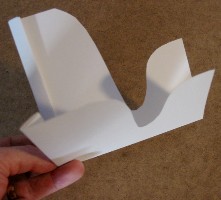
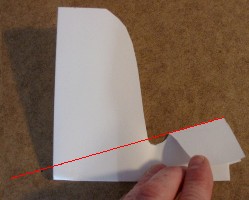
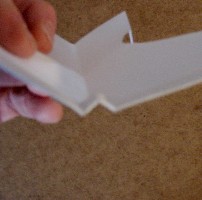
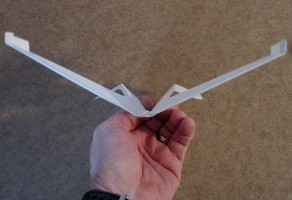
 After cutting, the plane should look like the picture above left. Now fold the tail wings so that the angle of the fold makes an imaginary line to somewhere out in front of the nose, shown in the middle picture above. The next step is to put a curl on the main wings. Curl the edges downward with your finger. Try to make them curl smoothly, and identically on both wings. 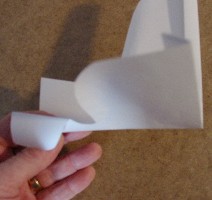
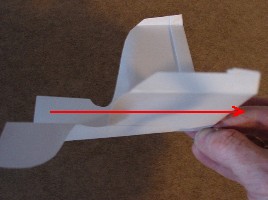 Examine your plane for symmetry. If the two sides aren't identically shaped, and identically positioned, the plane won't fly straight. The plane is launched slowly by pulling it forwards from the front, shown above right. After some experimenting, you should be able to get the plane to fly straight. Now try some aerobatics! If you change the curvature of the wings, vary the direction of the folded-up wingtips, and remove some of the symmetry, the plane can be made to do all sorts of turns and loops! |