 An anemometer is used to measure wind speed. When building weather instruments for classroom use, it is often difficult to make an anemometer that gives accurate readings, as they are not easy to calibrate.
What we have for you here are the plans for a simple hand-held anemometer that comes with its own calibration table, ready to use! If you build it as shown, it should give readings accurate to about +/- 5%. The design and table come from 'The Amateur Scientist' in an old issue of Scientific American magazine.
You will need the following items for each anemometer you build:
- 1 regulation table tennis ball
- 50 cm of 2 lb test fishing line
- 1 protractor
- 1 wooden dowel (about 40 cm long)
- 1 small screw
- 1 small 'stick-on' spirit level
|
In addition, you will need some red nailpolish, a small sewing needle (at least as long as the diameter of the ball), a penknife, some matches and some plastic cement.
Note that you must use a regulation table tennis ball, in order to ensure that its weight is correct. The sprit level can be obtained at any large sports store, in the 'RV Accessories' section.
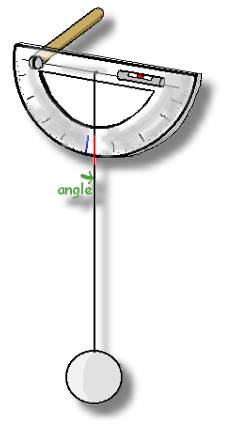
Here's what the finished anemometer will look like:
|
The dowel is attached to the protractor along its baseline using a screw. You'll need to start a hole first in the plastic protractor with the penknife.
Attach the stick-on spirit level on the other side. It must align exactly with the baseline of the protractor.
(Test this later by making sure the fishing line hangs straight down through 90 degrees when the level reads horizontal)
Then heat the needle with a match, and make a small hole in the protractor for the fishing line, right at the baseline midpoint.
Insert one end of the fishing line through the hole, tie a knot, and seal the hole on the back side with some glue.
|
|
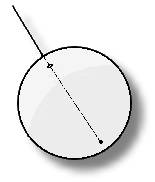
To prepare the table tennis ball, heat the needle and carefully poke a small hole on each side of the ball. Then thread the free end of the fishing line through the holes.
The length of the fishing line from its attachment point on the protractor to the top of the ball must be 30 cm. Tie a knot in the line that protrudes through the bottom of the ball, and seal it with a small bit of glue. Cut off any excess line and glue.
|
Finally, use a small amount of the red nailpolish to colour the fishing line at the place it passes by the scale on the protractor. This will make it easier to see.
Using the Anemometer
It will help if you have one person holding the anemometer, and another person reading the scale on the protractor.
Hold the anemometer level, parallel to the direction of the wind, and well in front of you. (The reason for the long dowel andle is to minimize turbulence from your body, which could affect the reading.)
Your partner can read the angle of displacement at the bottom of the protractor. This can range anywhere from 90 degrees (no wind) to 20 degrees or less (lots of wind).
Of course, several measurements should be made, and the results averaged.
Use the table below to determine the wind speed:
|

|
Angle
|
km/h
|
|
90
|
0
|
|
89
|
4.4
|
|
88
|
5.9
|
|
87
|
7.2
|
|
86
|
8.3
|
|
85
|
9.3
|
|
84
|
10.2
|
|
83
|
11.0
|
|
82
|
11.8
|
|
81
|
12.5
|
|
80
|
13.2
|
|
79
|
13.8
|
|
78
|
14.5
|
|
77
|
15.1
|
|
76
|
15.7
|
|
75
|
16.2
|
|
74
|
16.8
|
|
73
|
17.3
|
|
|
Angle
|
km/h
|
|
72
|
17.9
|
|
71
|
18.4
|
|
70
|
18.9
|
|
69
|
19.4
|
|
68
|
20.0
|
|
67
|
20.5
|
|
66
|
21.0
|
|
65
|
21.4
|
|
64
|
21.9
|
|
63
|
22.4
|
|
62
|
22.9
|
|
61
|
23.4
|
|
60
|
23.8
|
|
59
|
24.3
|
|
58
|
24.8
|
|
57
|
25.3
|
|
56
|
25.8
|
|
55
|
26.2
|
|
|
Angle
|
km/h
|
|
54
|
26.7
|
|
53
|
27.2
|
|
52
|
27.7
|
|
51
|
28.2
|
|
50
|
28.8
|
|
49
|
29.3
|
|
48
|
29.8
|
|
47
|
30.2
|
|
46
|
30.9
|
|
45
|
31.4
|
|
44
|
31.8
|
|
43
|
32.5
|
|
42
|
33.1
|
|
41
|
33.6
|
|
40
|
34.2
|
|
39
|
34.9
|
|
38
|
35.5
|
|
37
|
36.2
|
|
|
Angle
|
km/h
|
|
36
|
36.8
|
|
35
|
37.4
|
|
34
|
38.2
|
|
33
|
38.9
|
|
32
|
39.7
|
|
31
|
40.5
|
|
30
|
41.3
|
|
29
|
42.1
|
|
28
|
43.0
|
|
27
|
44.0
|
|
26
|
45.0
|
|
25
|
45.9
|
|
24
|
47.0
|
|
23
|
48.2
|
|
22
|
49.3
|
|
21
|
50.6
|
|
20
|
52.0
|
|
For your convenience, we have reproduced this data
table on a separate page by itself, for easy printing.
Weather Instruments | Resources
|